Showing posts with label free. Show all posts

Wednesday, September 8, 2010

Baby Boy Blue


Just a quick little knit to take up a rainy afternoon.

Size 8 needles and a worsted weight yarn.

With DPN's cast on 12 sts on each of 4 needles
Knit 2, purl 2 around for 1-2 inches
Knit stockinette stitch for about 3 inches
Decrease rounds:
knit across needle 1 to last 2sts on needle, K2 together, repeat for needle 2,3 and 4
Repeat this around until you have 3sts on each needle. Last round knit 2 sts together around. Fasten off and pull yarn through remaining sts and weave in ends.

Please do not copy this pattern as your own. Feel free to make and give away as many as you like, but if you sell any of your creations, please tag with a link to my page.

Monday, July 26, 2010

Paint it Black


Lion Brand Hometown USA and an N hook

Rnd 1) ch3, 11dc in 3rd ch from hook, sl st to top of first dc, (11dc)
Rnd 2) ch2, 2dc in each st around, (22dc)
Rnd 3) ch2, 2dc in first st, dc in next st, * 2dc in next st, dc in next st, repeat from * around,
Rnd 4-6) ch2, dc in each st around.
Rnd 7-9) ch1, sc in each st around.
Fasten off and weave in ends.

Monday, June 21, 2010

Layers of Shells


These are really quick little bags to make up. Good for small gift bags, the kids can use them to keep little treasures in. Or make it taller and use as a gift bag for wine bottle. :o)

I used an H hook and worsted weight yarn

Rnd 1) ch3, 12dc in 3rd ch from hook, sl st to top of first dc made. (12dc)
Rnd 2) ch2, 2dc in each st around, sl st to top of first dc made, skipping ch2 (24dc)
Rnd 3) ch2, * 2dc in first st, dc in next st, repeat from * around, sl st to top of first dc made
Rnd 4) ch2, * 2dc in first st, dc in next 2sts, repeat from * around, sl st to top of first dc made
Rnd 5) working in back loops only for this round, ch1, sc in each st around
Rnd 6) ch 1, * sc in first st, skip next 2sts, 5dc in next st(shell made), skip next 2sts, repeat from * around, sl st to top of first sc, 8 shells made
Rnd 7) changing color, ch3, 2dc in same st, * sc in 3rd dc of shell, shell in next sc, repeat from * around, 2dc in same st as first ch3, sl st to top of ch3
Rnd 8) changing color, ch1, sc in top of ch3, * shell in next sc, sc in 3rd dc of shell, repeat from * around, sl st to first sc,
Rnd 9) changing color, ch3, 2dc in same st, * sc in 3rd dc of shell, shell in next sc, repeat from * around, 2dc in same st as first ch3, sl st to top of ch3
Rnd 10-11) repeat rnds 8-9
Rnd 12) ch1, sc in first st, and in next 2sts, * dc in next 3sts, sc in next 3sts, repeat from * around,
Rnd 13) drawstring row. ch4, skip next st, * dc in next st, ch1, skip next st, repeat from * around, sl st to ch 3 of first ch4
Rnd 14) ch1, sc in same st, sc in each st and ch space around, sl st to close
Rnd 15) ch2, 3hdc in same st, * skip next 2sts, 4hdc in next st, repeat from * around, fasten off weave in ends.

Using a strand of each color held together,(Make 2) ch 40 or desired length to use as drawstrings weave in and out of rnd 13
Have fun and happy hooking

Wednesday, June 9, 2010

Can Can


Another can cozy. you will need to know how to Crossed Double crochet, you can find the tutorial here
http://crochet.about.com/library/blcrosseddc.htm

with Worsted weight yarn and G hook

Rnd 1)ch3, 11dc in 3rd ch from hook, sl st to top of first dc made(skipping ch2 now and throughout, makes a tighter closing), 11dc
Rnd 2)ch2, 2dc in each st around, 22dc
Rnd 3) working in back loops of this round, ch2, dc in each st around
Rnd 4-8) ch2, dc in each st around
Rnd 9+10) ch3, dc in st before ch3 (last st of previous round), crossed double crochet around, sl st to top of ch3, fasten off and weave in ends.

Monday, June 7, 2010

Mr. Jeff


It's that time of year when the kids are getting out of school and everyone is giving the teachers gifts. I am going to try to do some thing that they can use instead of just taking up space. Mr. Jeff is a teachers aid in my daughters school and he might not be back next year because of budget cuts.... We are going to MISS him tons. This is for him

Peaches N Cream cotton and a G hook

Rnd 1) ch2, 11 hdc in 2nd ch from hook, 11dc
Rnd 2) ch1, 2hdc in each st around, 22hdc
Rnd 3) ch1, * 2hdc in first st, 2hdc in next st, repeat from * around
Rnd 4-12) working in back loops , ch1, hdc in each st around
Rnd 13) ch1, revers sc around
Fasten off, weave in ends

Please be respectful of my pattern. Use your creations for what ever you like but please give my site credit for the pattern. Thank you!

Wednesday, June 2, 2010

Thick and Quick Beret


Using up some yarn that I have had in my stash FOREVER!

Lion Brand Thick and Quick Chenille and an N hook

Rnd 1) ch3, 11dc in 3rd ch from hook, sl st to top of first dc (11dc)
Rnd 2) ch2, 2dc in same st and in neach st around, (22dc)
Rnd 3) ch2, 2dc in same st, dc in next st, * 2dc in next st, dc in next st, repeat from * around, sl st to top of first dc, (33dc)
Rnd 4) ch2, 2dc in same st, dc in next 2sts, * 2dc in next st, dc in next 2sts, repeat from * around, 44dc
Rnd 5-8) ch2, dc in each st around
Rnd 9) ch2, * dc in first st, dc next 2sts together, repeat from * around, dc last 2sts together
Rnd 10-11) ch1, sc in each st around

Thursday, May 27, 2010

Dread Head


This is a quick headband if you will. I have made several sizes, but the larger ones are my favorite for holding back the hair. I made them light and airy for summer time. Make smaller ones for just a nice little head band or larger ones that hold the hair back a bit more. Go even a little longer and it will hold the hair right up off your neck for a large pony tail. Adding embellishments for an extra little something, like flowers, buttons, ribbons...

I used a K hook and worsted weight yarn.
The beginning uses a bit of measurement. Measure the size of intended head and chain an even number of chains to make the length. join with a sl st to form a circle being careful not to twist.
Rnd 1) ch4 (counts as first dc and ch1)* skip next ch, dc in next ch, ch1, repeat from * around, sl st to 3rd ch of first ch4
Rnd 2) sl st to first ch1 space, ch4,* dc in next ch1 space, ch1, repeat from * around.
Repeat Rnd 2 for desired length. Optional, when at desired lenght ch1, sc in each st around. This is what I have done with the lt. purple one.
The flower I used is just one I found on the net. Lion Brand has some and a few other sites.

Tuesday, May 18, 2010

Set of Dishcloths to knit


Worsted weight cotton yarn, small amount for each cloth and size US10 (6.0mm) knitting needles

Seed stitch cloth

Cast on 21sts
Knit 1, purl 1, knit 1 accross. Repeat this row for 5inches. Bind off


Checkered cloth

Cast on 21 sts,
Row 1) k3, p3, k3 accross
Row 2) p3, k3, p3 accross
Row 3+4) repeat rows 1+2
Row 5) p3,k3,p3 accross
Row6) k3,p3,k3 accross
Row 7+8) repeat rows 5+6
Repeat rows 1-8 two more times, repeat rows 1-4 once more, bind off. Weave in ends

Do Your Ears Hang Low!


Using a I hook and Worsted Weight yarn, I used Red Heart Super Saver
NOTE: The Brown hat had one less increase row, to make more for a toddler or small child. The green fits about an 8yr old
Rnd 1) ch3, 11dc in 3rd ch from hook, sl st to top of first dc, 11dc
Rnd 2)ch2 (does not count as st, now and throughout) 2dc in each st around, 22dc
Rnd 3) ch2, 2dc in same st as joining, dc in next st, * 2dc in next st, dc in next st, repeat from * around. 33dc
Rnd 4) ch2, 2dc in same st, dc in next 2sts, * 2dc in next st, dc in next 2sts, repeat from * around, 44dc
Rnd 5) ch2, 2dc in same st, dc in next 3sts, * 2dc in next st, dc in next 3sts, repeat from * around, 54dc
Rnd 6-12) ch2, dc in same st and in each st around, sl st to top of first dc
Do not fasten off
First ear flap:
Row 1)ch2, dc in next 8sts
Row 2)ch2, dc accross
Row 3) ch2, dc next 2sts together, dc in next 3sts, dc next 2sts together, dc in last st
Row 4)ch2, dc next 2sts together, dc in next st, dc next 2sts together, dc in last st
Row 5) ch2, dc next 3sts together, dc in last st
Row 6) ch1, sc all 3sts together, ch40 for tie fasten off
Second earflap
Starting at last st of first flap, skip 18 sts, attach yarn and repeat same as fist flap. Attach yarn at back of hat and sc evenly aroun. When working around tie, hold in front of yarn and sc behind tie. Fasten off and weave in ends. Please feel free to use my patterns for your own creations and do as you like with them, but give credit to my site for the pattern. Happy Hooking!

Thursday, May 13, 2010

Tiny Flower Scrubbie


Worsted Weight Cotton yarn and an H hook. Or whatever size you like ;o)

Rnd 1) ch3, 12dc in 3rd ch from hook, sl st to top of first dc, 12dc
Rnd 2) ch2, 2dc in each st around, 24dc
Rnd 3) ch1, * sc in first st, skip next st, 6dc in next st, skip next st, repeat from * around. 6 petals and 6 sc
Fasten off and weave in end.

Wednesday, May 12, 2010

Rolling Camo


For this I used Bernat Camouglage and size 10US knitting needles
You will need 16" 10US circular and/or DPN's

Cast on 61sts to 16" circular
Knit stockinette stitch (this will give you the bit of a roll at the begining) for about 10inches. Mine has a little bit of a slouch to it. You can add more or do less depending on what you want for your hat
Decrease rounds
Rnd 1) * knit 8, knit 2sts together, repeat from * around
Rnd 2)* knit 7, knit 2sts together, repeat from * around
Rnd3)* knit 6, knit 2sts together, repeat from * around
Rnd 4)* knit 5, knit 2sts together, repeat from * around
Rnd 5)* knit 4, knit 2sts together, repeat from * around
Rnd 6)* knit 3, knit 2sts together, repeat from * around
Rnd 7)* knit 2, knit 2sts together, repeat from * around
Rnd 8)* knit 1, knit 2sts together, repeat from * around
Rnd 9) knit 2sts together around, fasten off, thread yarn through remaining loops, pull tight and weave in ends.
Please feel free to use your own product for whatever you like, but if you can link back to my page for the pattern. I would love to see some of your creations.

Tuesday, May 4, 2010

Big Brown Hat


Using Red Heart Super Saver, or if you can get your hands on some thing nicer with the same weight Yay! and a J hook.


Rnd 1) ch3, 11dc in 3rd ch from hook, sl st to top of first dc, 11dc
Rnd 2)ch2 (does not count as st, now and throughout) 2dc in each st around, 22dc
Rnd 3) ch2, 2dc in same st as joining, dc in next st, * 2dc in next st, dc in next st, repeat from * around. 33dc
Rnd 4) ch2, 2dc in same st, dc in next 2sts, * 2dc in next st, dc in next 2sts, repeat from * around, 44dc
Rnd 5) ch2, 2dc in same st, dc in next 3sts, * 2dc in next st, dc in next 3sts, repeat from * around, 54dc
Rnd 6)ch2, 2dc in same st, dc in next 4sts, * 2dc in next st, dc in next 4sts, repeat from * around 64dc
Rnd 7)ch2, 2dc in same st, dc in next 5sts, * 2dc in next st, dc in next 5sts, repeat from * around 74dc
Rnd 8-16 ) ch2, dc in same st, dc in each st around, sl to top of first dc.
Rnd 17) ch2, dc decrease over first and second st, dc in next 5sts, * dc decrease over next 2sts, dc in next 5sts, repeat from * around, sl st to top of first decrease, 66sts
Rnd 18) ch1, sc first 2sts together, sc in next 4sts, * sc next 2sts together, sc in next 4sts, repeat from * around, 55sts
Rnd 19) ch1, sc first 2sts together, sc in next 3sts, * sc next 2sts tog, sc in next 3sts, repeat from * around. 44sts
Rnd 20+21) ch1, sc in each st around, fasten off.
Attach yarn towards front away from joining of rounds, Row 1) ch1, 2sc in first st, sc in next 20sts, 2sc in next st, ch1 turn, 22sts
Row 2-4) sc in each st accross, ch1, turn
Row 5-7) sc first 2sts together, sc accross to last 2sts, sc last 2sts together, fasten off
Reattach yarn at the back of hat, sc evenly around hat and brim. Fasten off and weave in ends.

Wednesday, November 18, 2009

Any Way You Want Pouch


This bag is very simple and easy, with so many color combination possibilities.

I used an H hook and Red Heart Super Saver Yarn, but any hook and yarn size would work, it just alters the size of your bag. This is a little bit rough explanation. Beads are optional but add a nice touch.

Make 5 basic granny squares (you can find several styles all over the net) in any size you like, mine were only 3 rnds for this. Use one for the base and then attach one on each side of square ane then sew up sides.
For Top closure
RND 1) attach yarn in any spot of a square and DC evenly around each of 4 square tops, sl st to first dc
RND 2)ch3 (counts as first dc and ch1 space) skip next st,* dc in next st, ch1, skip next st, repeat from * around, sl st to second ch of beginning ch3
RND 3) DC in each st around, st st to first dc, fasten off and weave in ends.

I made two drawstrings of about 70chs long and weaved in and out of RND 2. I also added some beads to each end of drawstring.

Tuesday, September 15, 2009

Simple Little Striped Shrug


This is just a rough pattern of what I have done for this shrug. I looked and looked for something I liked that wouldn't take a lot of time and to do what was asked of me! My girls know what they like.

This pattern is very easily adjustable. It's mostly a matter of measuring who the finished product is for. I used a size 10 US needle,and a 9 US for the neck ribbing and Bernat Baby Jacquards. My daughter is in a size 10-12, and I knit kind of loose. I didn't do a gauge, sorry about that. I used less than one skein.

I cast on 32sts, and did K2, P2 for 10 rows slipping first st of each row through out shrug, this makes an easier line up for sewing.
K1 row
P1 row for a total length from beginning of 6 inches.(mine was for elbow length so you can add here or make shorter)
On every knit row I did- Slip one, knit front and back of next st (increase made) knit accross to last two sts, increase in next st, knit last st,
Slipping first st, purl next row. Increase as many rows as you want. I added about 12 sts.
I then knit accross however many inches for the back, measuring from sholder blade to shoulder blade. Once I had the right length I then started the decrease rows, slip first st, ssk, knit accross to last three sts, k2tog, knit last st, then purl the purl rows, until you have the starting amount of sts. knit stockinette sts (knit knit rows, purl purl rows) for same amount as beginning side before increasing. I then did the 10 rows of 2x2 ribbing.
Sew up from ribbing what you would like for sleeves depending on how long you make your shrug, since mine is shorter, I only sewed up about maybe 6 inches on each side. You want to make sure you leave enough room for putting on..Measuring is VERY good!
I then used a circular needle 9mm, and picked up stitches around the opening to make a 2x2 ribbing around.
Please feel free to ask any questions. I know this isn't really a clear pattern. I am just giving a rough estimate of what I made.

Thursday, August 27, 2009

Taming the Butterfly


I worked these up over a couple of days. Hopefully I have worked out all the kinks! These are made to fit about a medium womans size hand. Wrist size about 7 inches with a little room for stretching.

I used a G hook and TLC Essentials in medium worsted for the varigated blue version, the lighter set is two strands of baby yarn held together.

Right Glove

Rnd 1) ch30, sl st to form ring being careful not to twits, ch2, (DOES NOT count as first dc now and through out) dc in same st and in each ch around, join to top of first dc (same for each row) (30dc)
Rnd 2) ch2, dc in same st and in each st around, join
Rnd 3)ch2, dc in same st dc in next 10sts, ch10, skip next 9sts, dc in next st and in each st around, join
Rnd 4 and 5) ch2, dc in same st and in next 10 sts, ch10, skip ch10, dc in next dc and in each st around, join
Rnd 6) ch1, sc in same st and in next 10dc, ch 5, sc around ch10's and into 5th skipped dc on round 2, ch5, sc in next dc and in each dc around, join
Rnd 7) ch1, sc in same st, sc in next 10sc, ch9, skip butterfly, sc in next sc and in each sc around, join
Rnd 8) ch2, dc in same st and in each ch around, join
Rnd 9) ch2, dc in samt st and in next 2sts, 2dc in next 2sts, dc in next 5sts, ch10 skip 9sts, dc in next st and in each st around, join
Rnd 10)ch2, dc in same st and in next 2sts, 2dc in next st, dc in next 2sts, 2dc in next st, dc in next 5sts, ch10, skip ch10, dc in next dc and in each dc around, join
Rnd 11)ch2, dc in same st and in next 2ss,2dc in next st, dc in next 4sts, 2dc in next st, dc in next 5sts, ch10 skip ch10, dc in next dc and in each dc around, join
Rnd 12) ch1, sc in same st and in next 3sts, ch4, skip next 6sts, sc in next st and in next 5sts, ch5, sc around ch10's and into 5th skipped st of rnd 8, ch5, sc in next dc and in each st around, join
Rnd 13) ch1, sc in same st and next 3sts and in each ch, sc in next 6sts, ch9, skip butterfly, sc in each st around, join
Rnd 14) ch1, sc in each st and each ch around, join Fasten off and weave in ends

Left Glove
Work same as right glove for Rnds 1-8
Rnd 9) ch2, dc in same st, dc in next 10sts, ch10, skip next 9sts, dc in next 5dc, 2dc in next 2dc, dc in last 3sts, join
Rnd 10) ch2, dc in same st and next 10sts, ch10, skip ch10, dc in next 5 dc, 2dc in next dc, dc in next 2sst, 2dc in next st, dc in next 3sts, join
Rnd 11) ch2, dc in same st and in next 10 sts, ch10, skip ch10, dc in next 5 dc, 2dc in next st, dc in next 4sts, 2dc in next st, dc in last 3sts, join
Rnd 12) ch1, sc in same st and next 10sts, ch 5, sc around chains and into 5th skipped dc of row 8, ch5, sc in next 5sts, ch4, skip next 6sts, sc in next 4 sts, join
Rnd 13) ch1, sc in same st and next 10 sts, ch9, skip butterfly, sc in next 6sc and in each ch4 space, sc remaining sts, join
Rnd 14) ch1, sc in each st and chain around, join Fasten off and weave in ends.

Please feel free to make and do what you wish with the finished product, but please give credit to my site for the pattern. Happy Hooking.

Friday, July 3, 2009

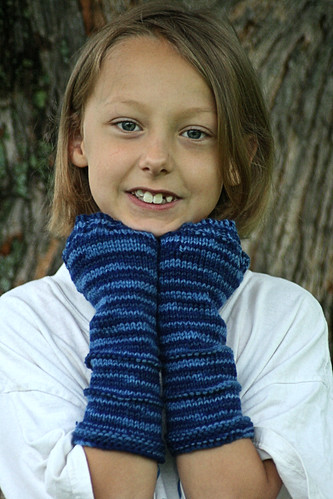
Stripe it up Fingerless Gloves


This is my first knitted pattern... so bare with me :o)

I made this to fit my 7 year old, her sister is modeling since this is a Christmas present. These are knitted on size5 (3.75mm) Double Pointed needles set of 4 and I used TLC Essentials in shaded denim

Caso on 36sts, 12 on each of three needles join to knit in the round
Row 1) knit
Round 2) purl
Rounds 3-6) repeat rnds 1 and 2
Rnd 7-16) Knit
Rnd 17) Purl
Rnd 18-27) knit
Rnd 28) purl
Rnd 29) knit
Knit even until measures 6" (or desired length) from beginning round
Thumb increase: Rnd 1) Increase in first st, knitting front and back of st, increast in next st, knitting front and back of st, knit around
Rnd 2 and 3) knit around
Rnd 4) knit front and back of first st, knit two even, knit front and back of fourth st, knit around
Rnd 5 and 6) knit even around
Rnd 7) knit front and back of first st, knit next 4sts, knit front and back of 5th sts, knit around
Rnd 8) Place first 8 sts on waste yarn or st holder, cast on 4 sts to needle 3, join to knit around
Rnd 9-13) Knit evenly
Rnd 14) knit first 2 sts together, knit accross needle, needle 2, knit accross to last 2sts and knit 2 sts together, needle 3 knit accross
Rnd 15-20)* Knit 2, purl 2 repeat from* around Fasten Off

Thumb: Place 5sts from wast yarn on N1, 3sts on N2, with N2 Pick up 4sts around gap, with N3 pick 4 more sts, attach yarn
Rnd 1-3) Knit evenly
Rnd 4-6) Knit 2, purl 2 around fasten off and weave in ends.

This is my original pattern, please don't sell as your own design, you may use your finished projects as gift craft fairs etc, but please give me/my website credit for the pattern. Thanks a bunch! :o)